
Gimp Tips - Bloom
Bloom is an effect light has on film where light appears to blur in around the edges when you have a dark object in front of a light background. Many photographers avoid such a juxtaposition for just this reason, but others use it purposely to gain a certain stylized look. The film Sky Captain and the World of Tomorrow used bloom extensively in building their unique look. Here is how you can add some fake bloom to a picture with a dark object against a light background.
 Here again to help out is my beautiful wife, Libby (photo by
Tim Howley). The original photo
didn't have the light background needed to illustrate this technique well
so I filled it in with these clouds to lighten it up a bit.
Here again to help out is my beautiful wife, Libby (photo by
Tim Howley). The original photo
didn't have the light background needed to illustrate this technique well
so I filled it in with these clouds to lighten it up a bit.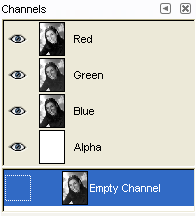 Begin by selecting the whole image, and copying it. Make a new channel and
past the image into it. This will automatically grayscale it, since
channels can't have color.
Begin by selecting the whole image, and copying it. Make a new channel and
past the image into it. This will automatically grayscale it, since
channels can't have color. With the channel still selected go into Colors|Curves and move the
bottom corner over to (128,0). This will darken the image in the channel
and sharpen the contrast, emphasizing the light areas of the image (that
we want to bleed into the darker ones).
With the channel still selected go into Colors|Curves and move the
bottom corner over to (128,0). This will darken the image in the channel
and sharpen the contrast, emphasizing the light areas of the image (that
we want to bleed into the darker ones).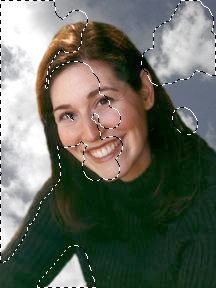 Turn the channel you created into a selection and grow it by about 10
(the amount you grow it affects how deep the bloom penetrates into the
dark areas of the image).
Turn the channel you created into a selection and grow it by about 10
(the amount you grow it affects how deep the bloom penetrates into the
dark areas of the image). Add a new transparent layer. Using the bucket tool, fill the selected area
with white.
Add a new transparent layer. Using the bucket tool, fill the selected area
with white. Select|None then Filters|Blur|Gaussian Blur by about twice as much
as you grew the selection (so in this case 20).
Select|None then Filters|Blur|Gaussian Blur by about twice as much
as you grew the selection (so in this case 20). Finally, turn down the opacity of that white layer to affect the degree
of the bloom. I used 40%.
Finally, turn down the opacity of that white layer to affect the degree
of the bloom. I used 40%.