
Gimp Tips - Spray Painted Stencil
I saw a poster recently that was made to look like it was done with a stencil and spray paint. I though it looked kind of cool so tried to recreate the look in GIMP.
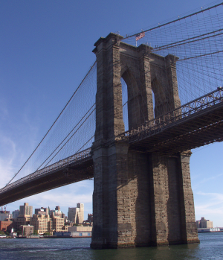 This works best with a picture that begins with a lot of contrast.
Outdoor scenes on bright days work well. I found this picture
at morgueFile, a nice source for
free stock photos.
This works best with a picture that begins with a lot of contrast.
Outdoor scenes on bright days work well. I found this picture
at morgueFile, a nice source for
free stock photos.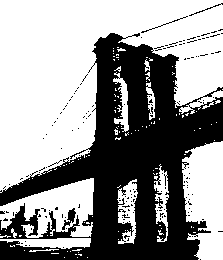 Apply Colors|Threshold and play with the level to get roughly the look you
want. Don't worry about the little speckly bits, we'll clean them up in a
minute.
Apply Colors|Threshold and play with the level to get roughly the look you
want. Don't worry about the little speckly bits, we'll clean them up in a
minute. We need a little extra room to fit our stencil in, so use Image|Canvas Size
to enlarge by about 15%. Click Center to keep your image in the middle.
Then do Layer|Layer to Image Size to fill that new space.
We need a little extra room to fit our stencil in, so use Image|Canvas Size
to enlarge by about 15%. Click Center to keep your image in the middle.
Then do Layer|Layer to Image Size to fill that new space.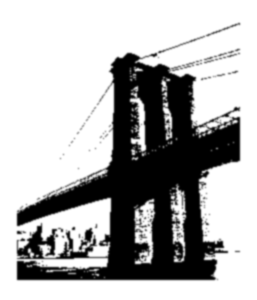 Now we'll clean up those speckles. Filters|Blur|Gaussian Blur by 2
pixels.
Now we'll clean up those speckles. Filters|Blur|Gaussian Blur by 2
pixels.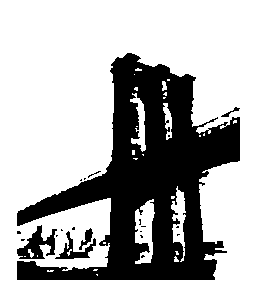 Colors|Threshold again and keep it at 127 this time. This should give you
a much cleaner version of your picture in black and white. Feel free to
paint out an remaining spots or clean up important lines by hand.
Colors|Threshold again and keep it at 127 this time. This should give you
a much cleaner version of your picture in black and white. Feel free to
paint out an remaining spots or clean up important lines by hand. I think those jagged pixely edges still look harsh, so I soften them up
with Filters|Blur|Gaussian Blur by 1 pixel. If your image has a high
resolution, this won't matter.
I think those jagged pixely edges still look harsh, so I soften them up
with Filters|Blur|Gaussian Blur by 1 pixel. If your image has a high
resolution, this won't matter.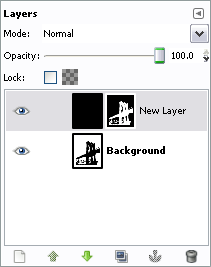 Copy the image. Add a new, black layer on top. Add a layer mask to that new
top layer. Paste your image into the layer mask, and do Colors|Invert.
This will give us a transparent copy of the image. We can play with the
bottom layer and keep our original shape, too.
Copy the image. Add a new, black layer on top. Add a layer mask to that new
top layer. Paste your image into the layer mask, and do Colors|Invert.
This will give us a transparent copy of the image. We can play with the
bottom layer and keep our original shape, too.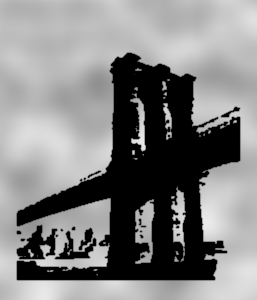 Make a new channel and on it do Filters|Render|Clouds|Solid Noise at about
5 each way, setting detail to 1. This gives us a random area where paint
will have gotten out under the edge of our stencil and will "spray" into the
white area a bit.
Make a new channel and on it do Filters|Render|Clouds|Solid Noise at about
5 each way, setting detail to 1. This gives us a random area where paint
will have gotten out under the edge of our stencil and will "spray" into the
white area a bit.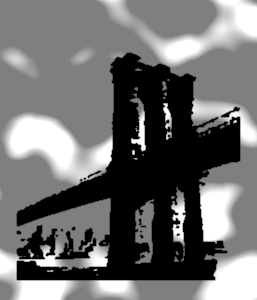 Do Colors|Levels on the channel and set the input range to 130 to 160.
This will make a sharper delineation between the spray areas and the clean
areas.
Do Colors|Levels on the channel and set the input range to 130 to 160.
This will make a sharper delineation between the spray areas and the clean
areas.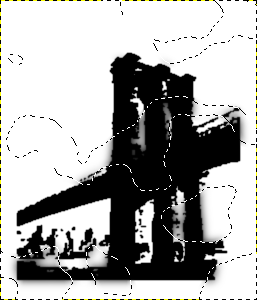 Do Channel to Selection and hide the channel. Back on your original bottom
layer Filters|Blur|Gaussian Blur by about 5% of your image size.
Do Channel to Selection and hide the channel. Back on your original bottom
layer Filters|Blur|Gaussian Blur by about 5% of your image size.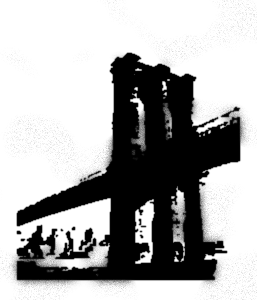 Do Filters|Noise|RGB Noise. Uncheck "Independent RGB" and set the levels at
about 0.10. That will add some grainyness to the overspray, which is what
spray paint looks like. For a high resolution image individual pixel noise
won't be big enough to be visible, but it works fine for most web-scale
images.
Do Filters|Noise|RGB Noise. Uncheck "Independent RGB" and set the levels at
about 0.10. That will add some grainyness to the overspray, which is what
spray paint looks like. For a high resolution image individual pixel noise
won't be big enough to be visible, but it works fine for most web-scale
images.