
Gimp Tips - Water Damage
Want to make a graphic look aged and distressed? I've got two words for you: water damage. The effect looks best on posters or photos and can be toned down for a really subtle addition or ramped up to be really obvious.
 You need to start by aging your "paper" a bit. If you do this on pure
white or a solid color it will just look out of place. I started with a
slightly off-white color (255,247,232).
You need to start by aging your "paper" a bit. If you do this on pure
white or a solid color it will just look out of place. I started with a
slightly off-white color (255,247,232). Next add a layer with a darker version of that color (255,221,155).
We'll use this to add some texture to the paper.
Next add a layer with a darker version of that color (255,221,155).
We'll use this to add some texture to the paper. Add a layer mask to that darker layer and fill it with
Filters|Render|Clouds|Solid Noise. Set both sizes to 16.
Add a layer mask to that darker layer and fill it with
Filters|Render|Clouds|Solid Noise. Set both sizes to 16. I deliberately made this texture a little too strong. You can tone it
down to whatever level you like by adjusting the opacity of the upper
layer. I set it down to about 25%.
I deliberately made this texture a little too strong. You can tone it
down to whatever level you like by adjusting the opacity of the upper
layer. I set it down to about 25%.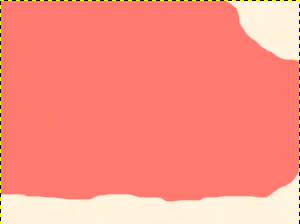 Make a new channel called "Water Area" and paint in the area of the water
damage. Actual water damage is found most often in the corners of papers
and along the bottom. But it could be along any edge or in spots.
The final edge of the water damage will be slightly inside this so don't
be afraid to define a large area.
Make a new channel called "Water Area" and paint in the area of the water
damage. Actual water damage is found most often in the corners of papers
and along the bottom. But it could be along any edge or in spots.
The final edge of the water damage will be slightly inside this so don't
be afraid to define a large area.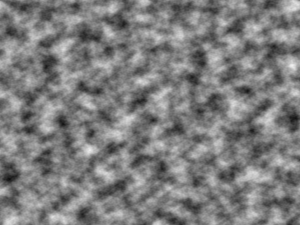 Actual water damage also has a bumpier edge than you want to draw by hand
so now we'll do some fanciness to
rough up the edge of the water area we just defined. Start by making a
new layer and filling it with Filters|Render|Clouds|Solid Noise.
This time set both sizes to 16 and the detail up to 3 or 4.
Actual water damage also has a bumpier edge than you want to draw by hand
so now we'll do some fanciness to
rough up the edge of the water area we just defined. Start by making a
new layer and filling it with Filters|Render|Clouds|Solid Noise.
This time set both sizes to 16 and the detail up to 3 or 4. Add a white layer on top of that. Do Channel to Selection on "Water Area".
Select|Feather by a value about 10% of your image size (this image is
300 pixels wide so I used 30). Now bucket fill that with black on to
your white layer.
Add a white layer on top of that. Do Channel to Selection on "Water Area".
Select|Feather by a value about 10% of your image size (this image is
300 pixels wide so I used 30). Now bucket fill that with black on to
your white layer.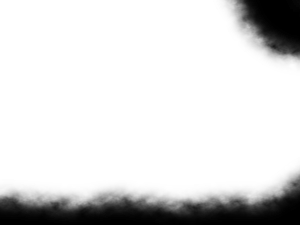 Set the layer mode to Hard light and merge down.
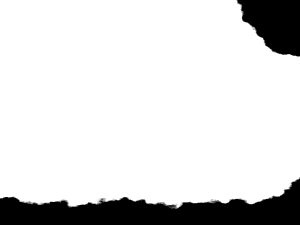 Make that rough edge more crisp by ramping the contrast up to at least
100. Edit|Copy this and hide the layer.
Make that rough edge more crisp by ramping the contrast up to at least
100. Edit|Copy this and hide the layer. Make a new channel. Call it "Water Edge". Paste in the image you just
copied.
Make a new channel. Call it "Water Edge". Paste in the image you just
copied.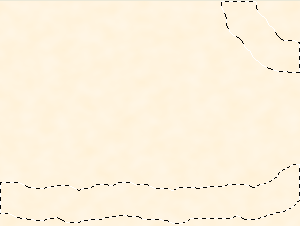 Now to make the actual water damage. Do Channel to Selection on "Water
Edge". Then Select|Border by about the same ammount you used for the
feather before. In the Border Selection dialog check "Feather border"
and "Lock selection to image edges".
Now to make the actual water damage. Do Channel to Selection on "Water
Edge". Then Select|Border by about the same ammount you used for the
feather before. In the Border Selection dialog check "Feather border"
and "Lock selection to image edges".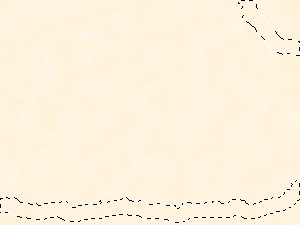 Next do Subtract from Selection on the "Water Edge" channel.
 Make a new transparent layer on the top of your image and bucket fill
this selection on it with black.
Make a new transparent layer on the top of your image and bucket fill
this selection on it with black. Set the layer mode to Soft light. This looks like water damage now, but
it's a little to faint.
Set the layer mode to Soft light. This looks like water damage now, but
it's a little to faint. Darken it by duplicating the water damage layer. If that is too dark for
you lighten it by lowering the opacity of that layer.
Darken it by duplicating the water damage layer. If that is too dark for
you lighten it by lowering the opacity of that layer. Add the content of you poster beneath the water damage layers so that
the print will show damage, too.
Add the content of you poster beneath the water damage layers so that
the print will show damage, too.